
Showing posts with label raised bed. Show all posts
Showing posts with label raised bed. Show all posts
Wednesday, December 8, 2010


Friday, August 20, 2010
Why Tomatoes, Why???
My tomatoes keep dropping flowers. According to my coworker, they do this when nighttime temperatures reach below 50 degrees fahrenheit, but it hasn't been that cold. Perhaps it is a lack of sunlight? This is what it looks like:

She also says that she has a ton of medium-sized green tomatoes on her plants... I have only 5 tiny ones. Some of my plants are HUGE though! Check out this current view of the raised beds.

Ironically, it is the smallest, weakest looking tomato plant that has the only fruit which is beginning to ripen. It may be because it's in the clay pot, which warms the roots more and dries out faster... perhaps the plant is in its death throes, trying to reproduce in its last moments?

As of tonight, I will start spraying the flowers with Blossom Set in hopes that they will stay... it's a hormone that should override the plants' desires to drop flowers in the cold and wait for warmer times. It's my first year living in this area, but I have a feeling that it won't get too much warmer than this (isn't it summer yet?). Help me Blossom Set, you're my only hope for ripe delicious summer tomatoes!
How are your tomatoes doing this year, and do you have any advice for me?

All crunchy and droppy
She also says that she has a ton of medium-sized green tomatoes on her plants... I have only 5 tiny ones. Some of my plants are HUGE though! Check out this current view of the raised beds.

"Mr. Stripey" in the back is definitely a monster.
Ironically, it is the smallest, weakest looking tomato plant that has the only fruit which is beginning to ripen. It may be because it's in the clay pot, which warms the roots more and dries out faster... perhaps the plant is in its death throes, trying to reproduce in its last moments?

A bit pathetic, yet edible.
As of tonight, I will start spraying the flowers with Blossom Set in hopes that they will stay... it's a hormone that should override the plants' desires to drop flowers in the cold and wait for warmer times. It's my first year living in this area, but I have a feeling that it won't get too much warmer than this (isn't it summer yet?). Help me Blossom Set, you're my only hope for ripe delicious summer tomatoes!
How are your tomatoes doing this year, and do you have any advice for me?
Friday, May 7, 2010
Square foot gardening in the raised beds
Now it's time to divulge my plan for world garden domination! It is a mish-mash of instinct and internet research.
Square foot gardening principles that I'm using, based on internet research
- 1 plant per square: tomato, pepper, cucumber
- 4 per square: basil, chard, kale
- 9 per square: bean
- 16 per square: carrots, radishes
- Do it in a raised bed
Companion planting principles for the bed
- Plant basil & carrots near tomatoes
- Keep peppers away from tomatoes since too much tomato fertilizer will keep peppers from making lots o' fruit
- Keep cucumbers away from tomatoes

My own principles
- Grow up, not out
- Only grow things my husband and I like to eat raw
- Mix & match sizes of plants so they crowd less
- Harvest very frequently so that I can squeeze in a few extra plants
- Plant a row of radishes (cherry belle, which grows in 4 weeks) along two of the square-foot lines every week for a continuous harvest
- Grow oddly and strongly-colored items for an extra vitamin punch (most are dark reds & purples or orange-yellow)
- Grow something known to be pretty failsafe even for newbie gardeners (Sungold tomatoes & chard)
- Keep chard in the middle to separate non-compatible plants, since chard is the only one of my veggies that will be there year-round
- Keep copious notes so I can improve on the beds next year
- Don't be sad if there's too little sun for an abundant harvest
So... I've already planted the lettuce, kale, chard, carrots, radishes, and basil. I have to wait until it's a little warmer to transplant the tomatoes, cukes, and peppers. It's starting to feel like a real garden!
Square foot gardening principles that I'm using, based on internet research
- 1 plant per square: tomato, pepper, cucumber
- 4 per square: basil, chard, kale
- 9 per square: bean
- 16 per square: carrots, radishes
- Do it in a raised bed
Companion planting principles for the bed
- Plant basil & carrots near tomatoes
- Keep peppers away from tomatoes since too much tomato fertilizer will keep peppers from making lots o' fruit
- Keep cucumbers away from tomatoes

This rough chart shows the raised bed plan... #1 is left of #2, and there will be a trellis (and/or arch) connecting the cukes and beans. Click to enlarge
My own principles
- Grow up, not out
- Only grow things my husband and I like to eat raw
- Mix & match sizes of plants so they crowd less
- Harvest very frequently so that I can squeeze in a few extra plants
- Plant a row of radishes (cherry belle, which grows in 4 weeks) along two of the square-foot lines every week for a continuous harvest
- Grow oddly and strongly-colored items for an extra vitamin punch (most are dark reds & purples or orange-yellow)
- Grow something known to be pretty failsafe even for newbie gardeners (Sungold tomatoes & chard)
- Keep chard in the middle to separate non-compatible plants, since chard is the only one of my veggies that will be there year-round
- Keep copious notes so I can improve on the beds next year
- Don't be sad if there's too little sun for an abundant harvest
So... I've already planted the lettuce, kale, chard, carrots, radishes, and basil. I have to wait until it's a little warmer to transplant the tomatoes, cukes, and peppers. It's starting to feel like a real garden!
Monday, May 3, 2010
Raised Bed Gardening, part 3
Since I'm loosely following the Square Foot Gardening principles, I divided my beds up into 20 square-foot squares. Since I'm cheap, I just used sticks and leftover garden twine. Some people like the look of wood slats for dividers, but I am planning on growing radishes along the division lines so I don't want to block their sunlight.

And since I'm neglectful at times (er, I mean, when I go on vacation) and summers are hot here, a drip system is a must. Luckily the original owners of the house have a vast network of drip system under their thick layer of mulch, so it was a simple thing to find the tubing near the raised beds and run it along my soil. I used a 50-foot roll of 1/4" tubing (lots was left over), 10 stakes to hold the tubing down, 15 corner pieces, 4 T-shaped pieces, 20 in-line 1gallon/hour drips, and 3 larger tube segments for stopping the flow (bend the 1/4" tube, insert into larger tube piece to pinch it closed, and ta-da!).


Afterward, I shimmied the exposed drip system an inch or so down into the soil.
Now everything is ready for the funnest stuff... planting!
Raised Bed Gardening: Part 1, Building the bed
Raised Bed Gardening: Part 2, Choosing your soil amendments
Raised Bed Gardening: Part 4, Square Foot Gardening plan

Easiest drip system pattern: like a U
And since I'm neglectful at times (er, I mean, when I go on vacation) and summers are hot here, a drip system is a must. Luckily the original owners of the house have a vast network of drip system under their thick layer of mulch, so it was a simple thing to find the tubing near the raised beds and run it along my soil. I used a 50-foot roll of 1/4" tubing (lots was left over), 10 stakes to hold the tubing down, 15 corner pieces, 4 T-shaped pieces, 20 in-line 1gallon/hour drips, and 3 larger tube segments for stopping the flow (bend the 1/4" tube, insert into larger tube piece to pinch it closed, and ta-da!).

Easiest way to stop the flow in a drip system... bend the hose.

Afterward, I shimmied the exposed drip system an inch or so down into the soil.
Now everything is ready for the funnest stuff... planting!
Raised Bed Gardening: Part 1, Building the bed
Raised Bed Gardening: Part 2, Choosing your soil amendments
Raised Bed Gardening: Part 4, Square Foot Gardening plan
Sunday, May 2, 2010
Raised Bed Gardening, Part 2
Today I'm going to write a little bit about the soil in a raised bed. The main reason for having a raised bed is so that you can put in the perfect soil combination above inadequate ground soil.
Step 1: Prepping the site
I got rid of the thin layer of decorative decomposed granite on the surface, and set it aside. When we move, I can remove everything and just smooth this back over the top and the side yard will again look untouched. Make sure your bed will be level and add some stakes in the corners temporarily to hold it in place. Once the soil's in, it won't move.
Step 2: Amend the existing soil to a depth of 1 foot
I have really really dense grey clay for soil, so I asked around and got advice to add cedar or redwood mulch.
Mixing in the mulch makes the clay soil "friable" which means that it is loose and crumbly, which is important so that the roots can easily penetrate the soil. I used one bag of a brand called "Gorilla Hair" (it really does look like monkey hair!) for 20 square feet of clay, which was perfect. My shovel was short at 6 inches, so I dug down twice.

Step 3: Fill with nicer soil
Now that the earth has been tinkered with, it's time to fill up the bed!

Step 4: Add compost
I added organic compost, since these will be organic veggies I'll want to eat. Making it a mix of everything is good... ours had mushroom and well-rotted manure compost along with worm castings. Homemade compost would have been best... but until I can get space away from the house for a pile, I won't be saving up my yard cuttings for it. I do have a worm composter, but it has been neglected during the move and is not ready for harvesting some worm castings. I dug a trench down the middle of the beds, filled it with compost, and then mixed it in. Next time I really do want to use lots of worm castings, because the store-bought stuff seemed a little rough and a bit smelly.
Step 5: Add special fertilizers (Optional)
Here I just added (and mixed in to a depth of about a foot) a special organic tomato fertilizer from Burpee.

Step 6: Mulch.
I haven't done this yet, and don't know if I will... I suppose it'll depend upon how dry the soil ends up getting over summer.
Looking for more?
Raised Bed Gardening, Part 1: Building the bed
Raised Bed Gardening, Part 3: Putting on the final touches
Step 1: Prepping the site
I got rid of the thin layer of decorative decomposed granite on the surface, and set it aside. When we move, I can remove everything and just smooth this back over the top and the side yard will again look untouched. Make sure your bed will be level and add some stakes in the corners temporarily to hold it in place. Once the soil's in, it won't move.
Step 2: Amend the existing soil to a depth of 1 foot
I have really really dense grey clay for soil, so I asked around and got advice to add cedar or redwood mulch.

Clay under the crust of decorative crushed rock.
Mixing in the mulch makes the clay soil "friable" which means that it is loose and crumbly, which is important so that the roots can easily penetrate the soil. I used one bag of a brand called "Gorilla Hair" (it really does look like monkey hair!) for 20 square feet of clay, which was perfect. My shovel was short at 6 inches, so I dug down twice.

Cedar mulch at the top, ready to get mixed in.
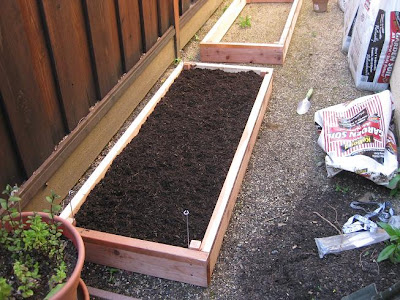
Step 3: Fill with nicer soil
Now that the earth has been tinkered with, it's time to fill up the bed!

Even the most generic "Garden Soil" is a much deeper rich black-brown than my clay mixed with cedar. The plants'll love it!
Step 4: Add compost
I added organic compost, since these will be organic veggies I'll want to eat. Making it a mix of everything is good... ours had mushroom and well-rotted manure compost along with worm castings. Homemade compost would have been best... but until I can get space away from the house for a pile, I won't be saving up my yard cuttings for it. I do have a worm composter, but it has been neglected during the move and is not ready for harvesting some worm castings. I dug a trench down the middle of the beds, filled it with compost, and then mixed it in. Next time I really do want to use lots of worm castings, because the store-bought stuff seemed a little rough and a bit smelly.

All done! You can see the 2nd bed at the top, ready for me to start the same process.
Here I just added (and mixed in to a depth of about a foot) a special organic tomato fertilizer from Burpee.

My tomatoes can take all the extra nutrients they can get!
Step 6: Mulch.
I haven't done this yet, and don't know if I will... I suppose it'll depend upon how dry the soil ends up getting over summer.
Looking for more?
Raised Bed Gardening, Part 1: Building the bed
Raised Bed Gardening, Part 3: Putting on the final touches
Monday, April 26, 2010
Raised Bed Gardening, Part One
Looks like it'll be warm enough to put those tomatoes in the ground in early May... er, which is just a week away! Always one to do things at the last minute, I spent the weekend putting in the two raised beds.
First step: Deciding Placement & Size
I'd like to say that I spent lots of time finding the perfect location for the raised beds, but really there was only one spot to put 'em (the empty side yard), and they could only be so big. I did check to see how much direct sunlight the beds would get, and it amounts to about 4.75 hours that the entire bed is covered... tomatoes need 6, so I'm keeping my fingers crossed. Who knows, maybe the plants will branch out enough to gather a few more rays.
Anyway, the rules to go by:
- Bed can be as long as you want, but no more than 4 feet wide (makes it hard to reach into the center)
- Keep 3 feet of space minimum between beds, so that there's enough space for you to comfortably get in between beds for easy harvesting
- Place in area not shaded by trees/houses/fencing, on level ground
Second Step: Acquire the Parts
Here's what we found at Ace Hardware, for 2 2'x5' beds:
- Redwood 2"x6" boards (redwood is rot-resistant, which is important, and also lovely)... cut into 4 5' and 4 2' pieces
- Redwood 1"x1" post... cut into 8 6" pieces
- Wood screws... 32 (4 per corner)
- Copper tape... 2 rolls (for a slug barrier)

Third Step: Assembly
As luck would have it, my husband morphed into his hunky and shirtless alter-ego, Man With Power Tools, and swooped in to save the day. I would have just screwed the boards together, which leads to instability.
Husband's words of wisdom:
- Revv the Power Tool, cackle maniacally
- Arrange your wood... use a support post in the corners, or metal brackets for extra support
- Drill guide holes for the screws... smaller than the width of the screws (this'll keep the wood from splitting, and will keep the screw straight as it enters the wood)
- Guzzle some homemade Perfect Sun Tea which was prepared for the occasion
- Screw in the screws... 2-inch wood screws (we had some left over from the dismantling of our old bed)
- Apply copper tape around top edge to prevent slugs & snails from eating all your veggies
- Rejoice!


First step: Deciding Placement & Size
I'd like to say that I spent lots of time finding the perfect location for the raised beds, but really there was only one spot to put 'em (the empty side yard), and they could only be so big. I did check to see how much direct sunlight the beds would get, and it amounts to about 4.75 hours that the entire bed is covered... tomatoes need 6, so I'm keeping my fingers crossed. Who knows, maybe the plants will branch out enough to gather a few more rays.
Anyway, the rules to go by:
- Bed can be as long as you want, but no more than 4 feet wide (makes it hard to reach into the center)
- Keep 3 feet of space minimum between beds, so that there's enough space for you to comfortably get in between beds for easy harvesting
- Place in area not shaded by trees/houses/fencing, on level ground
Second Step: Acquire the Parts
Here's what we found at Ace Hardware, for 2 2'x5' beds:
- Redwood 2"x6" boards (redwood is rot-resistant, which is important, and also lovely)... cut into 4 5' and 4 2' pieces
- Redwood 1"x1" post... cut into 8 6" pieces
- Wood screws... 32 (4 per corner)
- Copper tape... 2 rolls (for a slug barrier)

A little something like this
Third Step: Assembly
As luck would have it, my husband morphed into his hunky and shirtless alter-ego, Man With Power Tools, and swooped in to save the day. I would have just screwed the boards together, which leads to instability.
Husband's words of wisdom:
- Revv the Power Tool, cackle maniacally
- Arrange your wood... use a support post in the corners, or metal brackets for extra support
- Drill guide holes for the screws... smaller than the width of the screws (this'll keep the wood from splitting, and will keep the screw straight as it enters the wood)
- Guzzle some homemade Perfect Sun Tea which was prepared for the occasion
- Screw in the screws... 2-inch wood screws (we had some left over from the dismantling of our old bed)
- Apply copper tape around top edge to prevent slugs & snails from eating all your veggies
- Rejoice!

The posts go here!

I think the copper tape adds just the right hint of steampunk.
Stay tuned for more raised bed stuff, for the next post will be how to fill your bed... it's a lot more complicated than one would think!
Monday, April 5, 2010
Farming Plans
My husband had a surprise waiting when I came home... pre-cut untreated 2"x6" redwood boards, redwood mulch, copper tape, tomato cages, and a giant bag of organic compost containing worm castings. What more could a girl ask for?! These are the materials needed for the two 2'x5' raised beds I'm going to make in the side yard (using a few principles of square foot gardening but mostly just going on instinct, and with hopes that there will be enough sun), and it's so hard not to go out there and start it now!

However, this cast on my foot means I need to take a wee bit of a break, so I shall instead regale you with a list of edibles I'm putting in the garden. Each asterisk represents how many square feet I'm planning to devote to each plant in the raised beds... the rest are for pots or random places in the ground.
Veggies:
- Beans, pole, blue lake
- *Carrot, purple dragon
- ***Cucumber, lemon
- Garlic
- Onion, pearl, red/yellow/white
- Pea, snap, mammoth melting
- Pepper, sweet, baby belle
- *Pepper, sweet, gypsy
- **Pepper, hot, habanero
- *Radish, cherry belle
- *Tomato, black krim
- *Tomato, bloody butcher
- *Tomato, mr. stripey
- Tomato, sun gold
- *Tomato, yellow pear
- Zucchini, raven
Greens:
- *Beet, bull's blood
- Chickweed
- Dandelion
- *Lettuce: black-seeded simpson
- *Lettuce: "gourmet blend" from Burpee
- *Mustard, tendergreen
- Nasturtium, empress of india
- Nasturtium, spitfire
- ***Swiss Chard, bright lights
Herbs:
- *Basil
- Chives, garlic
- Cilantro/Coriander
- Marjoram
- Oregano
- Passionflower, official
- Peppermint
- Rosemary
- Sage
- Spearmint
- Thyme
- Wormwood
It looks like we'll be having flavorful homegrown salads and salsa in a few months! What are you growing this year?

So empty... so sad
However, this cast on my foot means I need to take a wee bit of a break, so I shall instead regale you with a list of edibles I'm putting in the garden. Each asterisk represents how many square feet I'm planning to devote to each plant in the raised beds... the rest are for pots or random places in the ground.
Veggies:
- Beans, pole, blue lake
- *Carrot, purple dragon
- ***Cucumber, lemon
- Garlic
- Onion, pearl, red/yellow/white
- Pea, snap, mammoth melting
- Pepper, sweet, baby belle
- *Pepper, sweet, gypsy
- **Pepper, hot, habanero
- *Radish, cherry belle
- *Tomato, black krim
- *Tomato, bloody butcher
- *Tomato, mr. stripey
- Tomato, sun gold
- *Tomato, yellow pear
- Zucchini, raven
Greens:
- *Beet, bull's blood
- Chickweed
- Dandelion
- *Lettuce: black-seeded simpson
- *Lettuce: "gourmet blend" from Burpee
- *Mustard, tendergreen
- Nasturtium, empress of india
- Nasturtium, spitfire
- ***Swiss Chard, bright lights
Herbs:
- *Basil
- Chives, garlic
- Cilantro/Coriander
- Marjoram
- Oregano
- Passionflower, official
- Peppermint
- Rosemary
- Sage
- Spearmint
- Thyme
- Wormwood
It looks like we'll be having flavorful homegrown salads and salsa in a few months! What are you growing this year?
Subscribe to:
Posts (Atom)