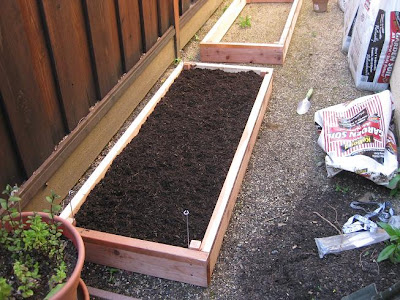
Step 1: Prepping the site
I got rid of the thin layer of decorative decomposed granite on the surface, and set it aside. When we move, I can remove everything and just smooth this back over the top and the side yard will again look untouched. Make sure your bed will be level and add some stakes in the corners temporarily to hold it in place. Once the soil's in, it won't move.
Step 2: Amend the existing soil to a depth of 1 foot
I have really really dense grey clay for soil, so I asked around and got advice to add cedar or redwood mulch.
Clay under the crust of decorative crushed rock.
Mixing in the mulch makes the clay soil "friable" which means that it is loose and crumbly, which is important so that the roots can easily penetrate the soil. I used one bag of a brand called "Gorilla Hair" (it really does look like monkey hair!) for 20 square feet of clay, which was perfect. My shovel was short at 6 inches, so I dug down twice.
Cedar mulch at the top, ready to get mixed in.
Step 3: Fill with nicer soil
Now that the earth has been tinkered with, it's time to fill up the bed!
Even the most generic "Garden Soil" is a much deeper rich black-brown than my clay mixed with cedar. The plants'll love it!
Step 4: Add compost
I added organic compost, since these will be organic veggies I'll want to eat. Making it a mix of everything is good... ours had mushroom and well-rotted manure compost along with worm castings. Homemade compost would have been best... but until I can get space away from the house for a pile, I won't be saving up my yard cuttings for it. I do have a worm composter, but it has been neglected during the move and is not ready for harvesting some worm castings. I dug a trench down the middle of the beds, filled it with compost, and then mixed it in. Next time I really do want to use lots of worm castings, because the store-bought stuff seemed a little rough and a bit smelly.
All done! You can see the 2nd bed at the top, ready for me to start the same process.
Here I just added (and mixed in to a depth of about a foot) a special organic tomato fertilizer from Burpee.
My tomatoes can take all the extra nutrients they can get!
Step 6: Mulch.
I haven't done this yet, and don't know if I will... I suppose it'll depend upon how dry the soil ends up getting over summer.
Looking for more?
Raised Bed Gardening, Part 1: Building the bed
Raised Bed Gardening, Part 3: Putting on the final touches


No comments:
Post a Comment